However I can now go back in and start to add the in-betweens. I can also start to bring in his expressions and lip sync.
Tuesday, 28 August 2012
Blocking Complete
Blocking usually consists of creating entire poses but for the purpose of this I only created very basic poses as I am concerned about how long his actions take, for example walking around and talking.
However I can now go back in and start to add the in-betweens. I can also start to bring in his expressions and lip sync.
However I can now go back in and start to add the in-betweens. I can also start to bring in his expressions and lip sync.
Monday, 20 August 2012
Alterations after Meeting
There are several things that need altering before I can continue with the blocking process:
Be aware of textures, don't cross over real and CG, change the newspaper texturesRemove the bag, it looks like a blob and takes attention away from the more important pointsGive the plate on the dining table it's own space, maybe scale it downOnly have two books in the bedroom and move forward, everything else looks out of placeCrumple the other towels in the bathroom, crease them on the radiator etcMake the pink cup brighterMake the cushions the same colours as the pink and blue cupsRe do blue cushion, pull it down slightly, like a hammock (be subtle)
I decided to change the pink cushion instead of the blue so I have made it look bigger and new
Saturday, 18 August 2012
Blocking
Now has come the time to start the blocking process, this is where i will key out the main poses in that particular scene or section. Seen as though i have decided to completely segregate the separate camera movements, it breaks the project down into smaller more manageable chunks.
I will add screen shots and comments into this particular post rather than starting new ones all the time, that way all of the information is in the same post.
SCREEN SHOTS

When Hamish turns over to switch the alarm off his arm is going through the object, I will try changing the settings of the obstacle that the cloth is colliding with to see if i can fix this problem
No amount of changing settings was helping, it was making it worse because the sheet was lifting off Hamish completely, so I decided to add shape animation and move the points needed by hand:

Also i want to add this video in, showing the movement of the cloth animation when Hamish rolls over, I like the way it naturally moves with him and sort of falls off him:
Thursday, 16 August 2012
Complete Character Turnaround
This is the best way to show off the construction of the model and the rig:
Extra Bone
The suggestion was made to add an extra bone into the panda character's leg to create a knee joint.
I have given this a go but it seems like his leg isn't long enough, there isn't enough points in the leg to use for the extra bone.
With that problem I would probably have to add extra points into the model and possible extend the length of his leg, with the amount of time I have left and the animation needing to start asap I have decided to not add an extra bone into the leg unless it is creating problems later on.
Wednesday, 15 August 2012
Final Model Adjustments
Before I can start the animating process properly I need to complete the modelling. This includes adding extra things left around the house, making it look more worn/used and adding beveling to the models. This is so that the edges will have nice highlights instead of being completely square.
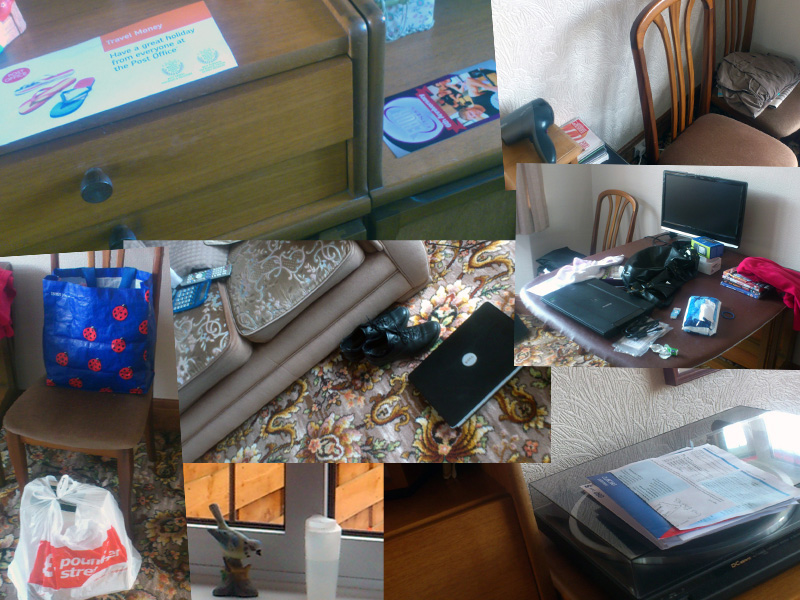
To help with the placement of items left around by Hamish, I have been taking photos over the last few weeks when people have left things lying around the house.
In the lounge and dining room, the main objects lying around were papers and bags/shopping:


The bathroom never really gets that messy but cleaning products and towels get left out.
Also there is a screen shot of the hallway after a car clearout:

The bedrooms seem to get the most cluttered, bins overflowing, papers, books, clothing:

The main one i wanted to focus on was the desk, Hamish's desk is very tidy but they are never like that:

PROGRESS RENDERS
Before I start adding clutter to the rooms/house I wanted to take some render shots to show the models as they are now. From the above points I have added all of the beveling that I want to add.


To help with the placement of items left around by Hamish, I have been taking photos over the last few weeks when people have left things lying around the house.
In the lounge and dining room, the main objects lying around were papers and bags/shopping:
In the kitchen, the main things left out are dirty pots in the sink or clean ones draining:

The bathroom never really gets that messy but cleaning products and towels get left out.
Also there is a screen shot of the hallway after a car clearout:

The bedrooms seem to get the most cluttered, bins overflowing, papers, books, clothing:

The main one i wanted to focus on was the desk, Hamish's desk is very tidy but they are never like that:

PROGRESS RENDERS
Before I start adding clutter to the rooms/house I wanted to take some render shots to show the models as they are now. From the above points I have added all of the beveling that I want to add.


SCENE SIZE
The scene was lagging quite badly as I was orbiting around it so I needed to find ways to cut the scene size down. The only way that really worked was to reduce the amount of 'models' in the scene, by this I don't mean 3D models, I mean the option where you can select several 3D models and group them together into a new 'model.
NEWSPAPERS
These are three links to newspaper articles I have used in my scene:
AFTER CLUTTER HAS BEEN ADDED
There's are similar render pictures after the clutter has been added:


BEVELING AND DINTING
These are some renders of additional details i added to models. I added dinting to the chair and the bed to show that Hamish always sits and sleeps in the same place, however the other chair is still perfect as noone has sat there. I have also included an example to show how I have been beveling the models:


Saturday, 4 August 2012
PreVis
I decided to go ahead and do a very simple previs, this is so that the story comes to life, it will show the timing and action a lot better than the animatic and stand me in good stead for the blocking.
This is proving to be very time consuming but it is also proving that the new timing created for the animatic is correct. I will persevere with it as it shows the story in a very simple form.
Also in between the rendering of the separate camera shots I have made a start on the dissertation.
This is proving to be very time consuming but it is also proving that the new timing created for the animatic is correct. I will persevere with it as it shows the story in a very simple form.
Also in between the rendering of the separate camera shots I have made a start on the dissertation.
Subscribe to:
Posts (Atom)