SCHOOL OF COMPUTING
UNIVERSITY OF TEESSIDE
MIDDLESBROUGH
TS1 3BA
Panda’s Tail
MA Digital Animation,
Sound & Visual Media
Jennifer Dale
1st August
2012
Supervisor: Maggie Parker
Second Reader: Nigel Kitching

chapter one
production
1 overview
This section of the report will cover the sections of my
project plan that have already been completed.
1.1 Blog
It is always important to keep an up to date blog as this
allows the project supervisor to follow the progression. The blog for Panda’s
Tail is constantly updated as work is completed; any tests, ideas, influences
or thoughts are added throughout as these will be relevant when it comes to
writing the dissertation.
1.2 Planning
1.2.1 Project Plan
Creating a plan before beginning the project helps to break
it down into smaller, manageable chunks rather than looking at the whole
picture as this can be overwhelming. It also helps the creator to go through
logical steps and the correct processes to complete a project of this type.
Regular updates are important to highlight problem areas.
1.2.2 Character Redesign
Having completed the majority of the pre-production earlier
in the year, a character design for Hamish was already drawn, however after
several months of thinking time a more suitable and aesthetically pleasing
design was created.
1.2.3 Character Profile
Having settled on a design for the main character, it is important
to create a personality. Research shows that the most effective way of doing
this is to create a character profile sheet consisting on important
characteristics and mannerisms. This is an important asset to any project
containing a character especially at the script writing stage as it can be
referred back to.
1.2.4 Specification
To help grant ethical release a project specification should
be written to note the intentions and objectives of a project. This particular
one included information about the context of the animation, the expected end
products, the proposed methods intended to be used and a justification for it.
1.3 Research
1.3.1 Pre-Production
As mentioned in the character redesign section the majority
of the pre-production work had been completed several months ago, however
referring back to it refreshes ideas and helps to develop it further.
1.3.2 Environment
Continuing on from the previous research into environments
it became apparent that one important section had been missed. There was little
research into the interior design of the house in particular. Using
Grandparents houses as examples of the kind of environment the lonely panda
should live in, the wallpaper was noticeably vintage. Taking this further would
include looking for a particular designer that specialises in old fashioned
style wallpaper.
1.3.3 Rigging
Past experience has shown that rigging can be problematic.
As this is not the main technical focus for this project, the time spent
rigging this by hand could be better utilised. With this in mind testing the
build in rigs within the 3D package could be the best option.
1.3.4 Emotion and Facial Expressions
The main influence for this project is the isolation and
loneliness students tend to feel sometimes at University. Having experienced
this first hand and not knowing how to deal with it, channelling the negative
emotions into a positive was a benefit. The emphasis in this project will be emotion
and expression. Ed Hooks talks about these areas so exploring this will help
the process.
1.3.5 Textures and Lighting
Keeping the textures to a minimum will help the render times
greatly, however in some cases they will help to emphasise certain objects. The
lighting for this scene will be very simple again to help with render times as
this is a major concern. Creating the illusion that light is coming through the
windows will be a challenge, as well as creating artificial lighting from the
inside.
1.3.6 Influences
Influences are a major part of a project; they are the
reason for creating it in the first place. Keeping a record of these on a blog
throughout the project will help to continuously develop ideas and to stay
motivated.
1.4 Designs and Story
1.4.1 Environment
Continuing with the idea of isolation, making the
environment seem very enclosed and claustrophobic will help the overall atmosphere.
Dropping the ceiling and tapering the top corners will create this effect,
being careful with light placement will create dark corners to make the rooms
feel dingy.
1.4.2 Script, Storyboards and Animatic
Allowing extra time for the story telling is a major benefit
as this section in particular always takes longer than expected. The script
proved very difficult, the story remained vague for a long period of time
before it could be finalised. It is important to be descriptive for the first
few sections of the story as it really helps to set the scene. This in turn
aids the creation of the storyboards as the camera angles and timing is already
in place. For this project going backwards and forwards from storyboard to
animatic was the only way to finalise the timing, sections of it were
unnecessary and over explained where as certain important duplications were
wrongly discarded.
1.4.3 Timing and Scene Selection
Referring back to the previous point, correcting the timing
was a major setback for this project, it is important to correct it before
moving on to the animating stage or it becomes more problematic. Planning the
shots for the animation at an early stage allows for creativity and
experimentation. The overall look and feel for this piece was already decided
so planning the camera movements was fairly simple. The decision was made to
section the entire story up to fifty eight separate camera shots and movements,
the idea being that render them separately and compositing them together will
counteract any problems or file corruptions.
1.5 3D Work
1.5.1 Character Model and Rig
Using previous knowledge of low poly modelling and correct
topology, modelling the character was a simple process. The head and the body
are separate objects, the arms and legs were created using a number of simple
extrusions. The rig proved to be a real challenge, as the character is humanoid
but mainly torso with small legs, it does not allow for the correct skeleton
and movement. The legs caused major issues with creasing and overlapping
polygons, until it became apparent that a new bottom half of the rig needed to
be created.
1.5.2 Environment Models and Renaming
Renaming all models, objects, materials and textures saves a
lot of time. Having to search for the correct object or material to make a
small adjustment is costly and infuriating. This is a vital stage in a project,
also freezing the modelling once it is complete helps with render times.
chapter one summary
The project is progressing nicely thanks to a detailed
project plan and serious hard work. Continuing to receive feedback aids the
project and making regular backups is crucial.
chapter two
the next stage
2 overview
This section of the report will discuss the parts of the
project that still needs to be completed before submission.
2.1 3D Work
2.1.1 Audio
Now that the story is finalised and there is a animatic to
work with, it would be worthwhile to start adding the audio intended for use to
it to see how it complements the piece. Having already organised the voice
actors the parts left to complete are the sound effects and the music
selections.
2.1.2 Previs and Blocking
The next stage before starting the actual animation is to
create a Previs or start blocking out the animation. Using a pose to pose
method of animation discards the possibility of experimentation but it does
allow the viewer to really visualise the project for the first time. This is
the method that will be used in this instance as it is the most reliable for a
good quality outcome.
2.1.3 Animation
When the blocking is complete and the timing is finalised,
the animation stage can begin. This will consist of firstly adding in-betweens
to the blocking keeping it in stepped mode, when the in-betweens are completed
the animation curves can be altered back to linear or spline as required.
Continue adding in-betweens until the action is complete and then go into the
animation editor and tidy up the animation curves as some key frames will not
be relevant.
2.2 Editing and Renders
2.2.1 Textures and Colours
Parts of the environment need their colours and textures
adjusting, the main important ones are there but they need tweaking. Some of
the textures are poor quality that will lower the quality of the animation and
others need lining up correctly.
2.2.2 Lighting
Having daylight on the outside and artificial lighting on
the inside may be too much of a contrast, text renders will need to be made and
adjustments to the lighting will be a definite.
2.2.3 Render Passes
There are three passes needed for this piece, apart from the
main render of the animation, including a shadow pass, a highlight pass and an
ambient pass will create the dark shadows and correct highlights on and around
objects to make the environment more believable. The possibility of adding a
mid tones pass will be considered towards the end of the project.
2.2.4 Rendering
Having been careful to keep render times as low as possible
throughout the project, the two parts causing concern are the overall length of
the animation and the amount of render passes included. Splitting the story
into sections and rendering them separately will allow the possibility for
rough sections to be inputted at the end if necessary.
2.2.5 Compositing
Compositing is not a major concern as the inbuilt compositor
within the 3D package is powerful enough to cope with the passes rendered out.
Once again they will be saved as individual sections ready to be placed
together at the end.
2.2.6 Final Edit
The final part of the process is the editing. Adobe Premiere
will be used to put the separate scenes together. Pro Tools will be used to add
the audio as it has a wider range of audio manipulation.
2.3 Submission
2.3.1 Polish and Extra Time
Leaving extra time at the end of a project is vital as it is
always necessary. It allows for any problems encountered to be dealt with
without running out of time.
2.3.2 Dissertation
Having already thought about the headings for the
dissertation and input the information into a report template, the writing
process will begin almost immediately. Beginning to write the dissertation early
whilst still completing the animation, instead of leaving it until the end,
keeps the information correct and keeps the project following.
chapter two summary
Having kept a project plan up to date throughout, it means
that all of the correct processes will have been gone through and knowing what
to do next is easy.
chapter three
report section
3 overview
In this final section of the report, a preview from the
actual dissertation is presented. The style of writing is not academic, this is
because getting the information and ideas onto paper is important, going back
afterwards to edit, proof read and rewrite is a vital stage
3.1 Report Preview
Building the rig
My previous experiences with rigging haven't been altogether
successful; however I decided to give it a go. I created a very simple rig
containing enough bones for the movement. When I attached it/enveloped it to
the model the movement wasn't working. Creasing and twisting appeared and after
researching how to create a more appropriate rig I realised that the built-in
Biped Rig in Softimage would probably be the better option.
The rig on the left shows how it originally looked before I altered it to fit my model. The one on the right has been scaled down to fit the body parts of my panda model. All the separate pieces had to be scaled down individually or it caused problems with the movement later on.
The rig on the left shows how it originally looked before I altered it to fit my model. The one on the right has been scaled down to fit the body parts of my panda model. All the separate pieces had to be scaled down individually or it caused problems with the movement later on.
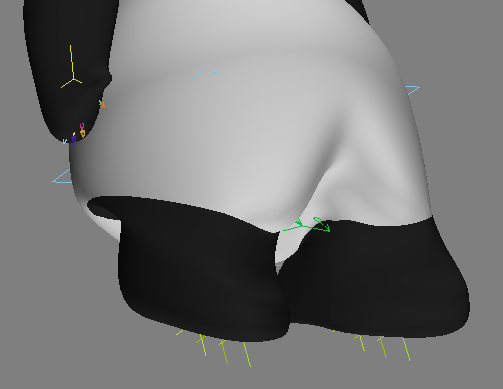
This shows the rig
placed inside the panda model. I had to scale down the neck sections as he
doesn't have a neck, the part above that connects to the head control had to be
placed higher up and the shoulders had to be adjusted. I extended the spine
because I designed him out of proportion so he could have small, stubby legs
and waddle rather than walk normally to compensate for his large stomach. I
moved the waist control down and put the hip control above; this creates a nice
movement in his stomach when he walks.
Now that the rig is properly set up and adjusted to fit the
model, I needed to start the enveloping process. Straight away I noticed that
the legs were proving difficult, when I moved the model or the top of the leg
controls I was getting strange creasing and twisting.
When I attached the model to the rig by enveloping it, the weighting of it was
far away from what I needed it to be. To fix this I had to use weight painting
in order to tell which points on the model to be controlled by which
bones/controls. I had a major problem with this as some of the points where
being controlled 100% by a bone and wouldn't connect to another bone, to fix
this I had to choose the 'reassign locally' option, then make sure all bones
and controls were showing by clicking 'show all'. I had to find the point
number in the table and move the sliders needed across.
The neck section of the model worked surprisingly well, even though he doesn't really appear to have a neck I still want it to look like he has one, be it hidden, to create this affect I allowed some of the points in his chest to move when his head is rotated.
For the eyes I originally thought that I could control them by rotating the top
eyelid, the bottom eyelid and the actual eyeball individually but after a quick
test it was too difficult and time consuming to continue with it. After a bit
of research I realised I could control it using [insert method]. It means that
I can use the position of a null or a curve to control the movement of a
particular object/model. I am using the transition of two circle curves to
control the shutting of the top and bottom eyelids on both eyes, then the
rotation of a square curve to control the movement of the eyeballs.
After I had finished fixing the eyes I went back to the rig. It still needed tweaking so that when he bent forwards or slightly backwards there wasn't any creasing, I also hid the parts of the rig that I won't be using to save later confusion.
Continuing on from tidying up the rig and hiding any bones
or parts that I won't be using to control my rig, I decided to use shadow bones
to help. You can re position them outside of the model and you can
use a different shape to make them easier to select. I decided to use
rectangles and cubes as they still represent the size of the bones.
Most areas of the rig are now complete but I am still having
problems with the legs. The back of the feet are creasing together, the stomach
is moving too much when the leg is lifted and the foot stretches away from the
leg. I tried to use weight painting to fix this problem but I was still having
issues with it.
The main reason for the odd movement with the legs I believe is because I
couldn't use the bones to rotate the legs and feet. I tried to rearrange the
rig slightly to compensate the movement but in the end i deleted the original
parts for the legs and built my own. I used a simple two bone tier, one for
control the leg and the other to allow the foot to bend.
I'm now thinking that adding an extra bone to create a knee
might make the movement more believable. At the moment he is waddling slightly,
which is the look I was going for but I think it's too obvious.
chapter three summary
Having found following the academic writing style difficult,
the decision was made to get the information written up first and then return
later to adjust it.
chapter four
report contents page
4 overview
This section contains the most up to date version of the
dissertation contents page. Adjustments will be made throughout the writing
process.
CONTENTS
No comments:
Post a Comment